How to Create Custom Forms in VIDIZMO
VIDIZMO’s Custom Forms provides users with the flexibility to create tailored forms for a variety of use cases within the VIDIZMO Portal. Users can add a variety of form fields, customize their layout, and preview changes in real-time, all through a user-friendly interface.
In this article, we will walk you through the process of creating a custom form, following a step-by-step guide.
Prerequisites
- To create custom forms, users must be a member of a group with the Manage Form Templates permission enabled.
Create Custom Forms Page
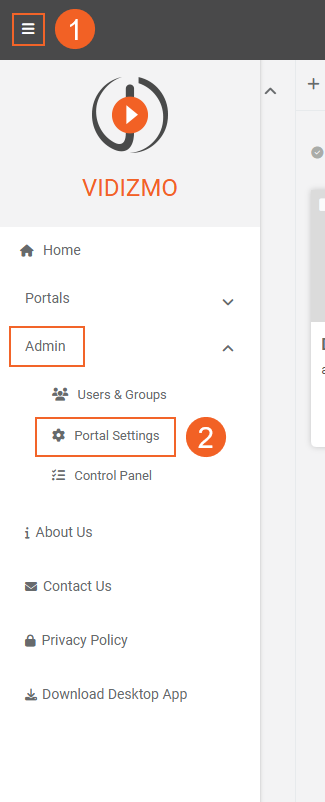
- Open the navigation pane by clicking the menu button at the top left of your screen. 2.Expand Admin tab and select Portal Settings.

- In the portal settings menu, click Library.
- Click Custom Forms.
- On the Custom Forms page, click the Add Custom Form button.

- On the Form Creation screen:
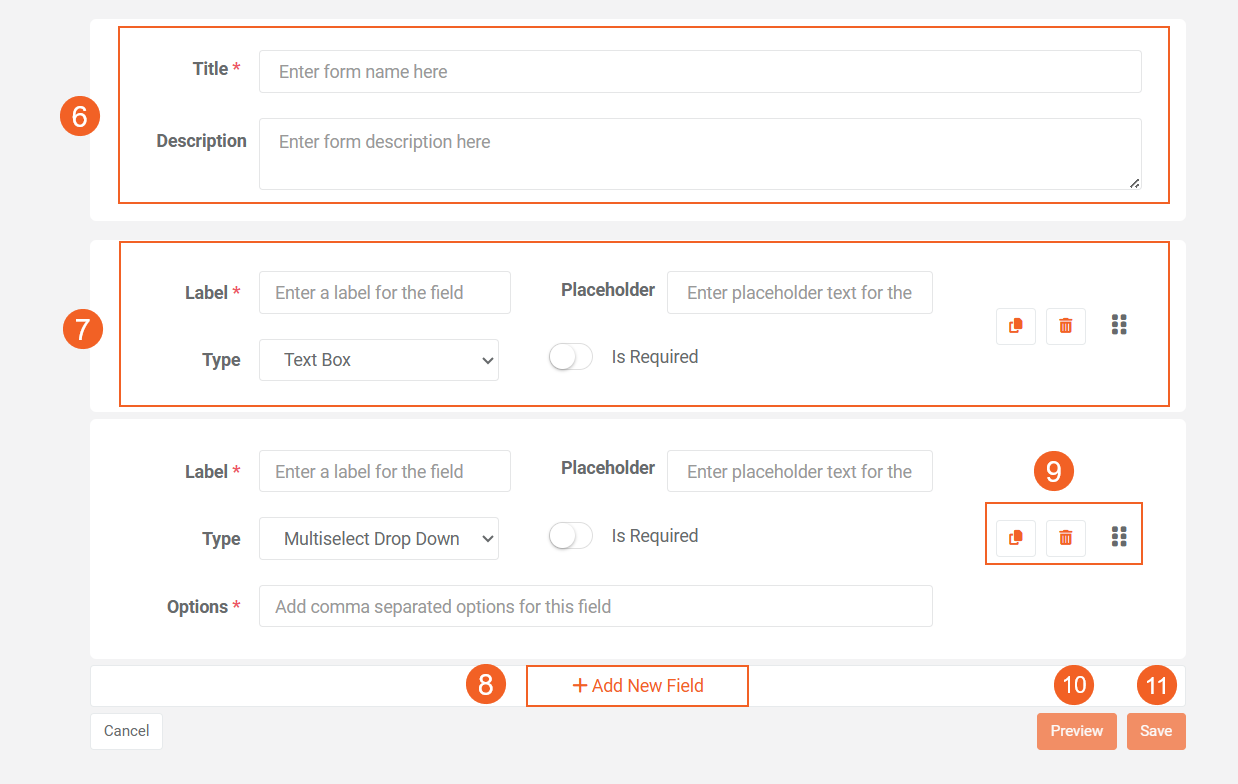
- Title: Enter a name for your form in the Form Name field.
- Description: Add an optional description for your form in the Description field.
- Fill in the form fields.
- Enter the label text for the field.Choose from the different input types for this field (we will explore these options in more detail below).
- Use the Is Required toggle to make this field mandatory or optional.
- Depending on the selected input type, additional configuration options may appear. For example, a Text Box input type will allow you to add Placeholder Text.
- Manage Fields
- To continue adding more fields, click the + Add New Field button again.
- You can use the Copy button to duplicate any field.
- Use the Delete button to remove a field from your form.
- Use the Drag button to rearrange the order of the fields on your form.
- Click the Preview button to see a live view of your form to check how it will appear to the users.
- Once you are satisfied with the form, click the Save button.

After saving, your form or form template will be listed on the Custom Forms page.You can create and manage multiple forms from this central location.
Manage Custom Forms
- To make adjustments to an existing form, click the Edit button.
- To preview the form again, click the Preview button.
- To delete a form, click the Delete button.

Input Types and Their Configuration
When creating a custom form, you can choose from various input types. Each input type may come with different configuration settings that you can customize. Here’s an overview of the input types and their respective settings:
- Text Box
- Description: A simple text input field.
- Extra Setting:
- Placeholder Text — Enter the text that will appear inside the text box as a prompt for users.
- Preview: Displays a text box where users can type their information.
- Date
- Description: An input field that allows users to select a date from a calendar.
- Extra Setting:
- Placeholder Text — Enter the placeholder text to inform users about the expected input.
- Preview: Displays a calendar interface for users to select a date.
- Dropdown
- Description: A dropdown menu where users can select one option from multiple choices.
- Extra Settings:
- Placeholder Text: Enter the placeholder text for the field.
- Options: List the options that should appear in the dropdown, separated by commas (e.g., low, medium, high).
- Preview: Displays a dropdown list where users can select one option.
- Multi-select Dropdown
- Description: A dropdown menu that allows users to select multiple options from a list.
- Extra Settings:
- Placeholder Text: Enter the placeholder text for the field.
- Options: List the options for selection, separated by commas (e.g., Rejected, Pending, Approved, Drafted).
- Preview: Displays a dropdown menu with checkboxes, allowing users to select multiple options.
- Checkbox List
- Description: A list of checkboxes where users can select one or more options.
- Extra Settings:
- Options: List the options for checkboxes, separated by commas.
- Preview: Displays a set of checkboxes where users can select or deselect individual options.
- Radio Button
- Description: A set of radio buttons where users can select one option from a predefined list.
- Extra Settings:
- Options: List the options for the radio buttons, separated by commas.
- Preview: Displays a series of radio buttons, with only one option selectable at a time.
- Location
- Description: A location input field that opens a map powered by Google Maps, allowing users to select a location and provide coordinates.
- Preview: Displays a button that opens a map for users to select a location.
- Consent Question
- Description: A yes/no question field, similar to an acceptance of terms and conditions.
- Extra Settings:
- Placeholder Text: Enter the text for the question.
- Details: Add any additional information the user may need, and use markdown formatting to customize the text.
- Preview: Displays a yes/no radio button option, and when users click the 'here' link, they will see the detailed text with any markdown customization applied.