How to Conduct Live Streams on VIDIZMO Using OBS Studio
Overview
Open Broadcaster Software, commonly referred to as OBS, is an open-source software renowned for its prowess in real-time video and audio capturing. This versatile tool facilitates seamless broadcasting to multiple servers and platforms concurrently. At its core, OBS offers a harmonious blend of high performance and user-friendly configuration options, all encapsulated within an intuitive interface.
OBS excels in seamlessly incorporating live camera feeds alongside prerecorded video, audio, graphics, creating a dynamic blend. Transitions and various video effects contribute to a polished result. OBS encodes content and dispatches the live streaming to VIDIZMO for distribution.
A standout feature of Open Broadcaster Software is its open availability, freely usable and customizable under the GNU General Public License v2.0 or higher. Empowered by a robust API, it facilitates plugin development for tailored customization and enhanced functionality.
OBS boasts a variety of presets designed to simplify video streaming. You can effortlessly stream your content to multiple Streaming Services or establish a Custom Streaming Server.
This guide focuses on configuring OBS Studio for live streaming on VIDIZMO, detailing the essential steps for a seamless setup. To explore the broader range of OBS functionalities, see the following links:
Before You Start
- To successfully conduct a live streaming, it is essential to set up an ECDN Node in collaboration with your chosen Streaming Server Provider. For further details, see:
- Once the ECDN Node has been configured, it is imperative to establish a publishing point corresponding to the configured ECDN Node. For additional information, see:
- Ensure you belong to a group with Live Streaming and Live Control Room features enabled, or have a CAL that grants the features' permissions.
NOTE: In this guide, the Wowza Cloud Streaming Server is used as the selected ECDN configuration. However, you have the flexibility to opt for any server that aligns with your preferences. Regardless of the server you choose, the procedure for configuring OBS Studio remains the same.
Live Streaming Using OBS Studio
Install and Launch OBS Studio
- To initiate the process, select OBS Studio Download. This link will direct you to acquire the most up-to-date version of the software.
- Proceed by downloading and subsequently installing OBS Studio on your computer.
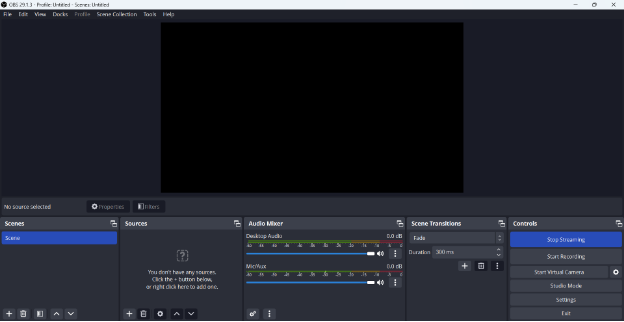
- Once you have successfully installed the OBS Studio on your machine, launch the Open Broadcaster Software and you will get the following OBS Studio Interface.
NOTE: For this guide, Version 29.1.3 is used, tailored to seamlessly operate on Windows 10 and 11.
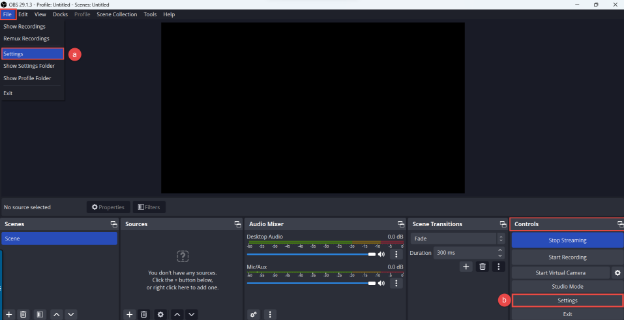
Access and Configure General Settings
- You can configure your settings in two distinct ways:
- Navigate to the top navigation bar, select File > Settings.
- Alternatively, you can select the Settings button within the Controls section.
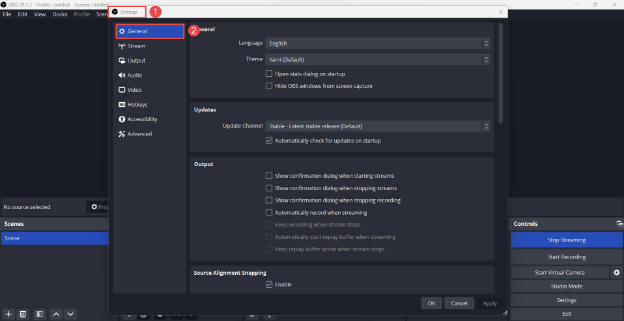
- In the Settings screen, explore various audio and video settings. Start with the General tab and keep the default settings for now. You can always learn more about these settings in the OBS Studio Guide.
Set Up Streaming Parameters
-
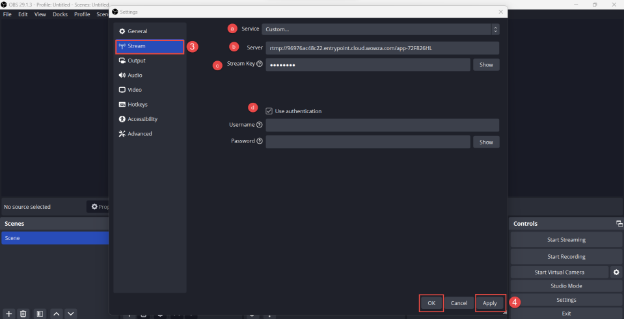
Move to the Stream tab for setting up streaming parameters, it consists of:
- Service: By default, OBS Studio offers a range of options for streaming services, each with its own set of presets for your convenience. Select the Custom option.
- Upon selecting Custom option as your Service, two input fields will appear. In the first one, you must input the Server which is equivalent to the Ingest Point of your Publishing Point.
- In the second field, input the Stream Key equivalent to your publishing point's Stream Name. To understand where to get these from, see Set Up Publishing Point Using Wowza Cloud.
- If your streaming server necessitates authentication, check the Use Authentication box, and provide your Username and Password credentials.
-
Finalize the process by first selecting Apply to save settings and then OK to close the Settings window.
Configure Output Settings
- The Output section allows you to tailor your output to match your preferences and requirements. It is important to understand the various options available to you for optimal results.
The Recording section within the Output tab comprises several essential options that shape the way your recordings are captured and stored.
- Recording Path: Provide the path where your recordings will be saved.
- Recording Quality: Choose the desired quality level from the options given for your recordings. Remember that higher quality settings result in larger file sizes.
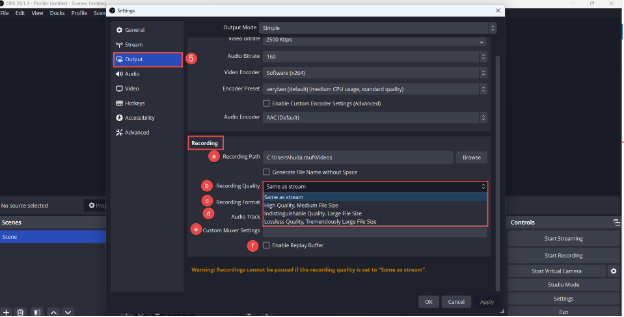
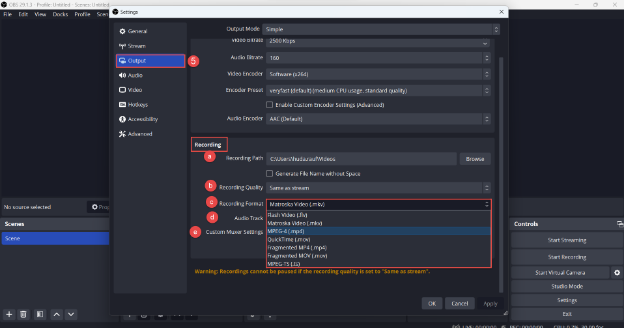
- Recording Format: Select the format in which you want your recordings to be saved.
-
Audio Track: Assign different audio tracks to your recordings, allowing for separate management and adjustment of audio sources.
-
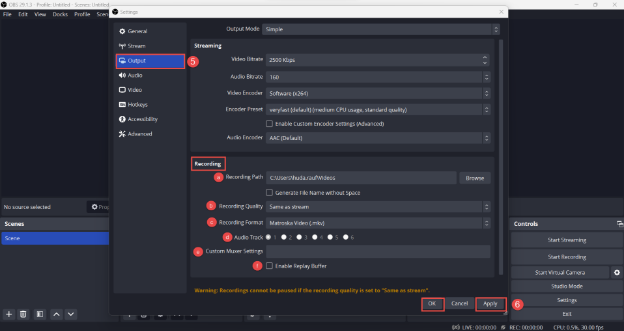
Custom Muxer Settings: Fine-tune your output settings further by exploring custom muxer settings. If you do not have any custom muxer settings, leave the box empty.
-
Enable Replay Buffer: Check the Enable the Replay Buffer box if you want to capture and save a buffer of your stream without hitting the record button.
-
Except for the Recording section, it is recommended to retain the default values in the Output tab.
-
Conclude the process by first selecting Apply to save settings and then OK to close the Settings window.
Enable Studio Mode
- To activate Studio Mode, go to the Controls section. Look for Studio Mode and select it.
- The Preview: Scene window displays the selected source, while the Program: Scene window shows the actual output.
- Use the Transition button to move from Preview to Program screen. This will help you to manage your stream by showing what you want and when you want.

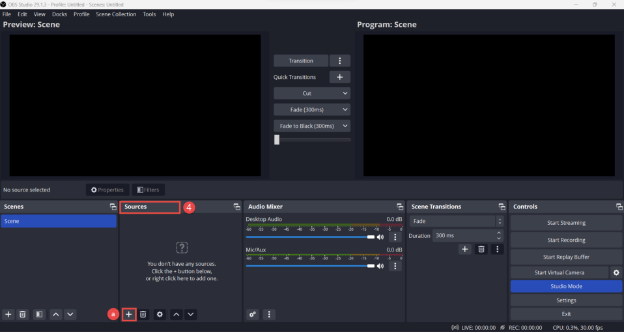
Add a Source
- Locate the Sources section in your OBS Studio screen:
- Select the + icon or right-click inside the Sources window to add sources.
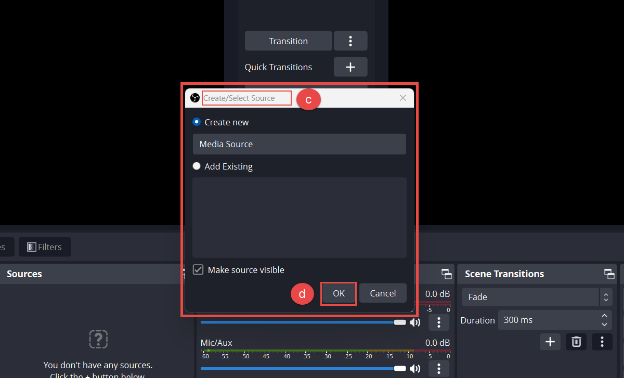
- You can select any source of your choice. In this guide, Media Source is used.

- Upon selecting Media Source, a new window will emerge to create a source. If you have previously created a source, select it here. Proceed by selecting your media file.
- Select OK to proceed to select your display for OBS to capture.
Source Properties
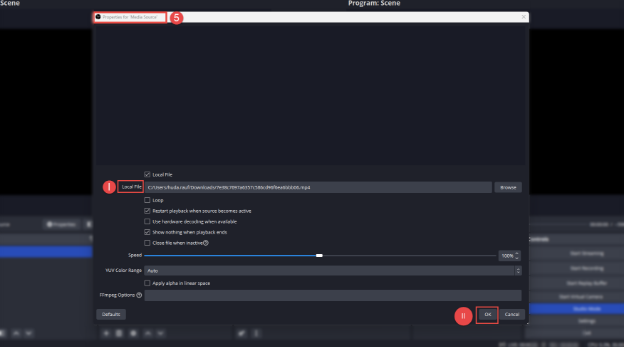
- Selecting OK triggers the opening of a new window called Properties for Media Share. This window serves as the gateway for:
- Selecting your video through the Local File option and configuring the file you intend to upload.
- Select OK to save the changes.
Preview and Transition
- Load your video to preview its appearance. As discussed above you can use the Transition button to move it to the Program: Scene window. After successfully loading the video, it will resemble as demonstrated below.
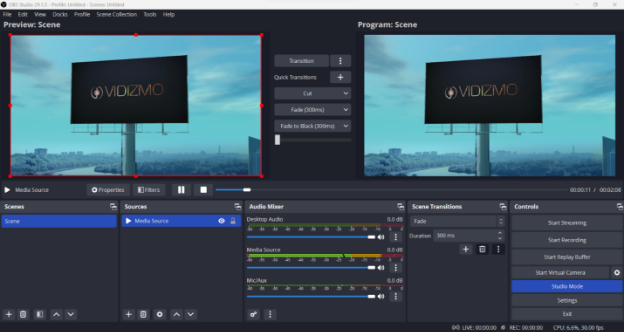
NOTE: Anything that appears on the right (Program: Scene) window is what the viewers will see.
Start the Streaming
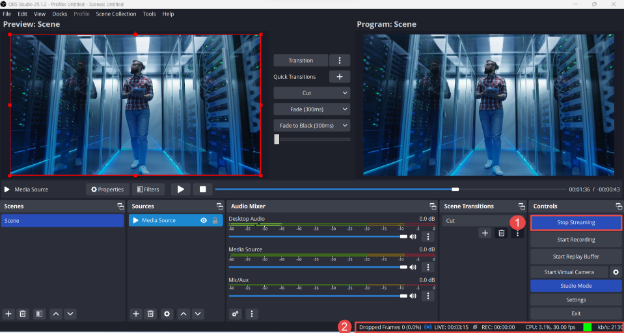
- After providing the information against all the parameters discussed in the Set Up Streaming Parameters section above, select Start Streaming to initiate your broadcast. The Start Streaming button turns to Stop Streaming, so you can stop the stream anytime.
- When the stream is live, OBS displays stream status and CPU usage at the lower-left corner of the interface.
View the Stream on VIDIZMO
- To preview your Live Streaming before publishing it, go to Control Panel > Publishing Point.
- Access the Scheduled Live Webcast in VIDIZMO to schedule your live webcast. To learn more about conducting a live webcast in VIDIZMO, see How to Conduct a Live Webcast in VIDIZMO.
- Upon scheduling a live webcast and subsequently selecting the save button, you will promptly receive a notification confirming the successful publication of the live webcast.
NOTE: You have full control over who gets to see your live streaming. You can share it with everyone using your portal. Or, if you want to be more selective, you can pick specific individuals. This is where the Limited Share feature comes in handy. To learn more about it, see Limited Sharing with Viewing & Editing Rights.
- You will find the webcast in the Portal's Library with other uploaded media.
- Proceed by selecting the live streaming to access the Video Playback screen, where you will be able to join the Live Streaming. Interactivity elements can be integrated into the webcast, including a live chat feature that allows viewers to engage by posting comments. You can learn more about the interactivity options during a live stream through this article: How to Enable Interactivity Options in a Live Session.
See Also
- How to Conduct a Live Webcast in VIDIZMO
- Understanding Live Streaming in VIDIZMO
- How to Enable and View Interactivity Options in a Live Session