How to Configure Live Chat Application Using Azure Service Bus
Live chat feature in VIDIZMO allows viewers to interact with each other and the session hosts during the live webcast. This allows participants to ask questions during the live webcast and receive responses from others who are actively engaged during the live webcast. Viewers are only able to see their own messages and responses to those messages, and it does not allow them to engage with other participants. VIDIZMO allows you to block or unblock users as needed from using Live Chat for sending messages. To learn more about VIDIZMO's enhanced chat features, see How to Enable Chat and Viewer Interactivity with Live Streaming.
NOTE: This configuration is only applicable for on-premise VIDIZMO deployments.
VIDIZMO has a built-in Live Chat feature that allows users to seamlessly interact during casting of a live session. VIDIZMO Chat does not require any detailed steps of configuration and is enabled by default in customers' main portal and all sub-portals. However, if your organization has a wide base of users that will be actively participating in a Live session, then you may configure Live Chat Application using Azure Service Bus.
Here's how you can configure Live Chat Application in VIDIZMO using Azure:
- Configuring Live Chat services on your Azure Portal
- Configuring Live Chat services on your VIDIZMO Portal
Before You Start
- You should have an Azure subscription to configure Live Chat Application.
- You should have VIDIZMO Application deployed on-premise. You can contact our Support for configuring Live Chat for your application on cloud.
- Ensure you belong to a group with Live Streaming and Live Control Room feature enabled, or have a CAL that grants this feature's permission.
- The changes you make will be reflected after restart of the Application and other services.
Steps to Configure Live Chat on Azure Portal
- Log in to your Azure Portal. Follow the steps in Create a namespace in the Azure Portal to create a Service Bus for your Live Chat.
- Once you have created a Service Bus, get the keys in the default Shared Access Policy of the newly created Service Bus. Follow the steps in Get the connection string to copy the Primary Key and Primary Connection String. These keys are required while configuring Live Chat in VIDIZMO.
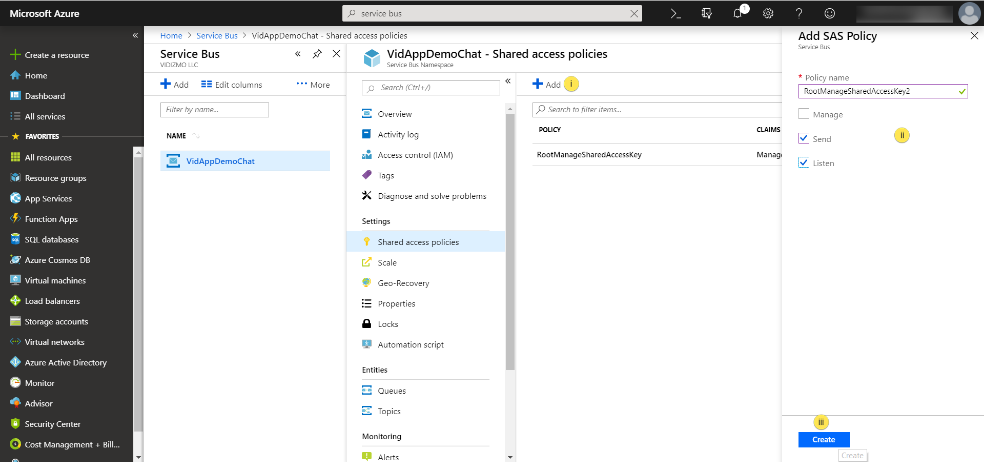
- Create another SAS Policy with different permissions. On the same Shared Access Policy screen as the last step:
- Select Add to create a new Shared Access Policy.
- Type in a name for the policy. Select Send and Listen.
- Select Create to proceed. A notification confirms Successfully created SAS Policy. Copy the Primary Key of the newly created policy, as in the previous step. This key is required while configuring Live Chat in VIDIZMO.
Steps to Configure Live Chat on VIDIZMO Portal
The Service Bus created on Azure Portal provides the information needed to configure VIDIZMO's Live Chat feature.
- From the Account Homepage, select the navigation menu on the top left of your screen.
- Expand the Admin tab.
- Select Control Panel.
- From the Control Panel screen, select Application Configuration, and then select the General tab.
- Under the General tab, provide information against the following fields. After a value has been provided in the field, make sure to select Update against every key to save your changes.
-
AzureChatServiceUrl: This is the Primary Connection String copied in Step 2 while configuring Live Chat in Azure Portal. When you are copying the Connection String, make sure to truncate the Primary Key value appended at the end of the string by default. For example, Azure Chat Service URL should be:
Endpoint=sb://vidappdemochat.servicebus.windows.net/;SharedAccessKeyName=RootManageSharedAccessKey;SharedAccessKey= -
Azure Service Bus Management Key: Key used for authentication by VIDIZMO to access and communicate with Azure Service Bus. This is the Primary Key copied in Step 2 while configuring Live Chat in Azure Portal.
-
Azure Service Bus Send Receive Key: Key used to send/receive messages in a chat room. This needs to be separate from the Management key because it is exposed at the client side for communication using Azure directly, hence enhancing security. This is the Primary Key copied in Step 3 while configuring Live Chat in Azure Portal.
-
A notification will appear briefly stating: Application Configuration Updated. Live Chat Application is now ready to use. To learn more about it, see How to Enable Chat in Live Streaming.