How to Setup SAML-P SSO using Azure
VIDIZMO supports Single Sign-On (SSO) using the SAML-P protocol with Microsoft Entra ID (formerly Azure Active Directory), allowing users to sign in with their Entra ID credentials.
To learn more about SSO, see Understanding Single Sign-On.
Prerequisites
- Ensure that you belong to a group where the Management of SSO + SCIM permission is enabled.
- You must have a Microsoft Entra ID account to create an enterprise application.
Configuration in Azure Portal
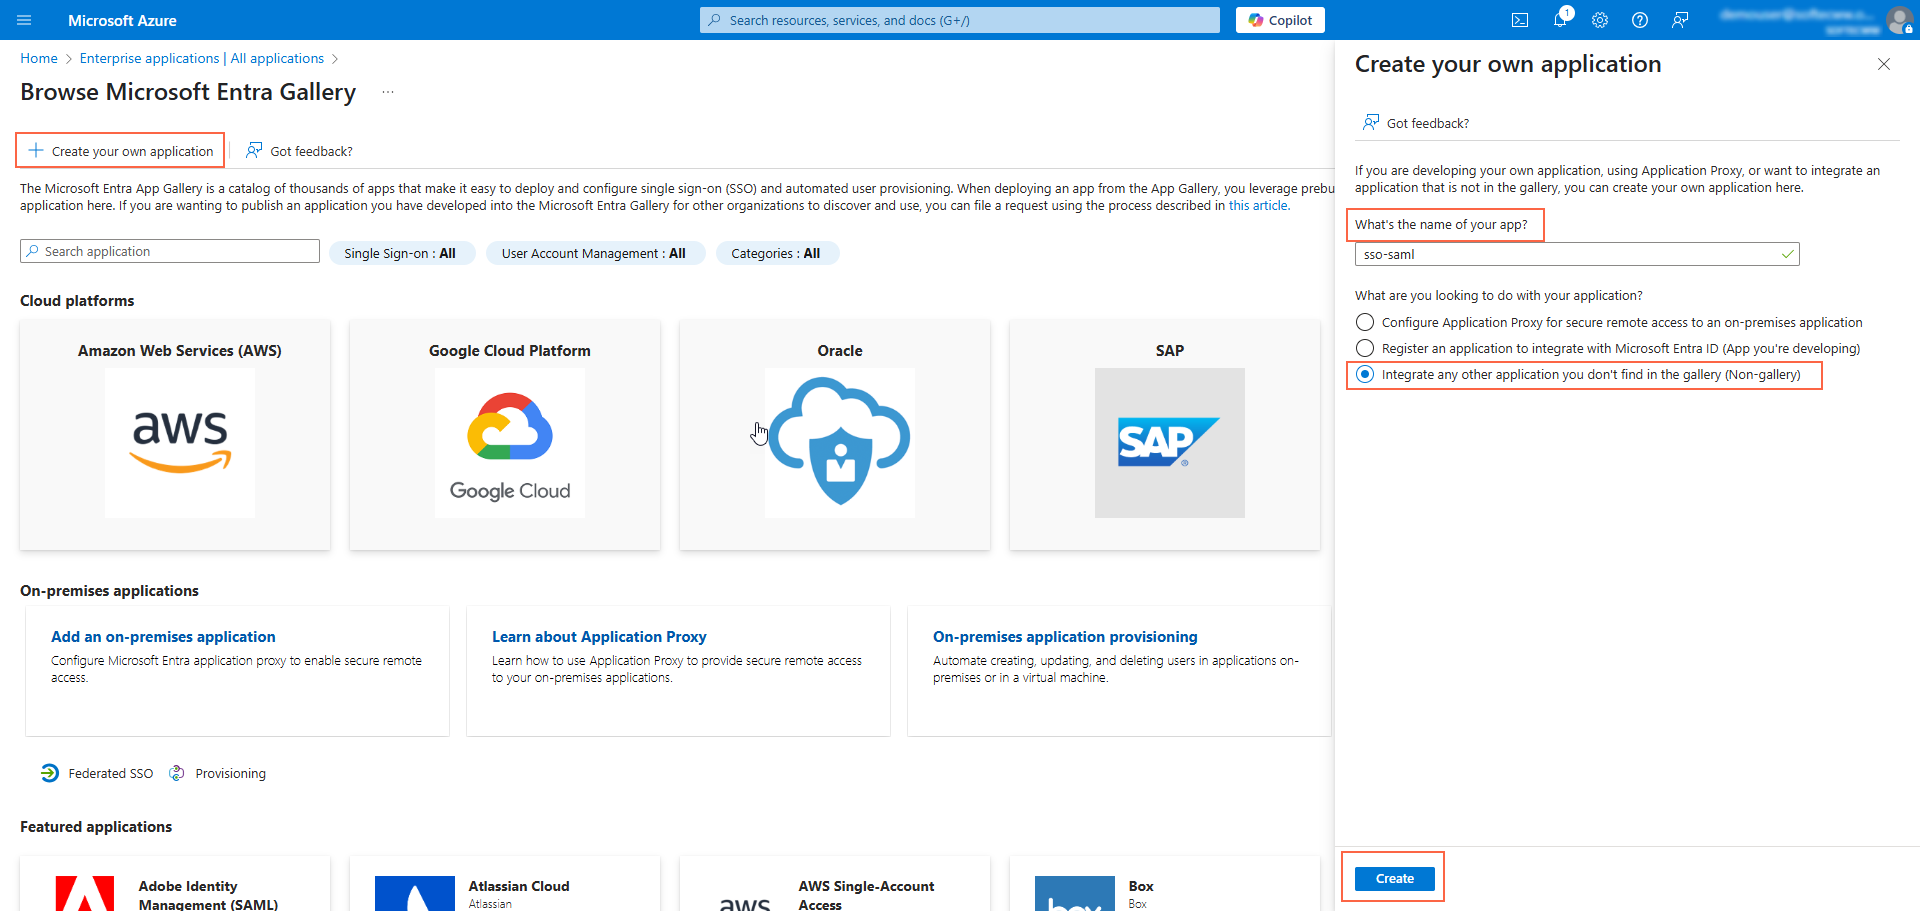
Create Application
- Sign in to the Microsoft Entra admin center.
- Go to Entra ID > Enterprise apps.
- Select Create your own application.
- Enter a name for your application.
- Select Integrate any other application you don't find in the gallery (Non-gallery).
- Select Create.
Set up SSO with SAML
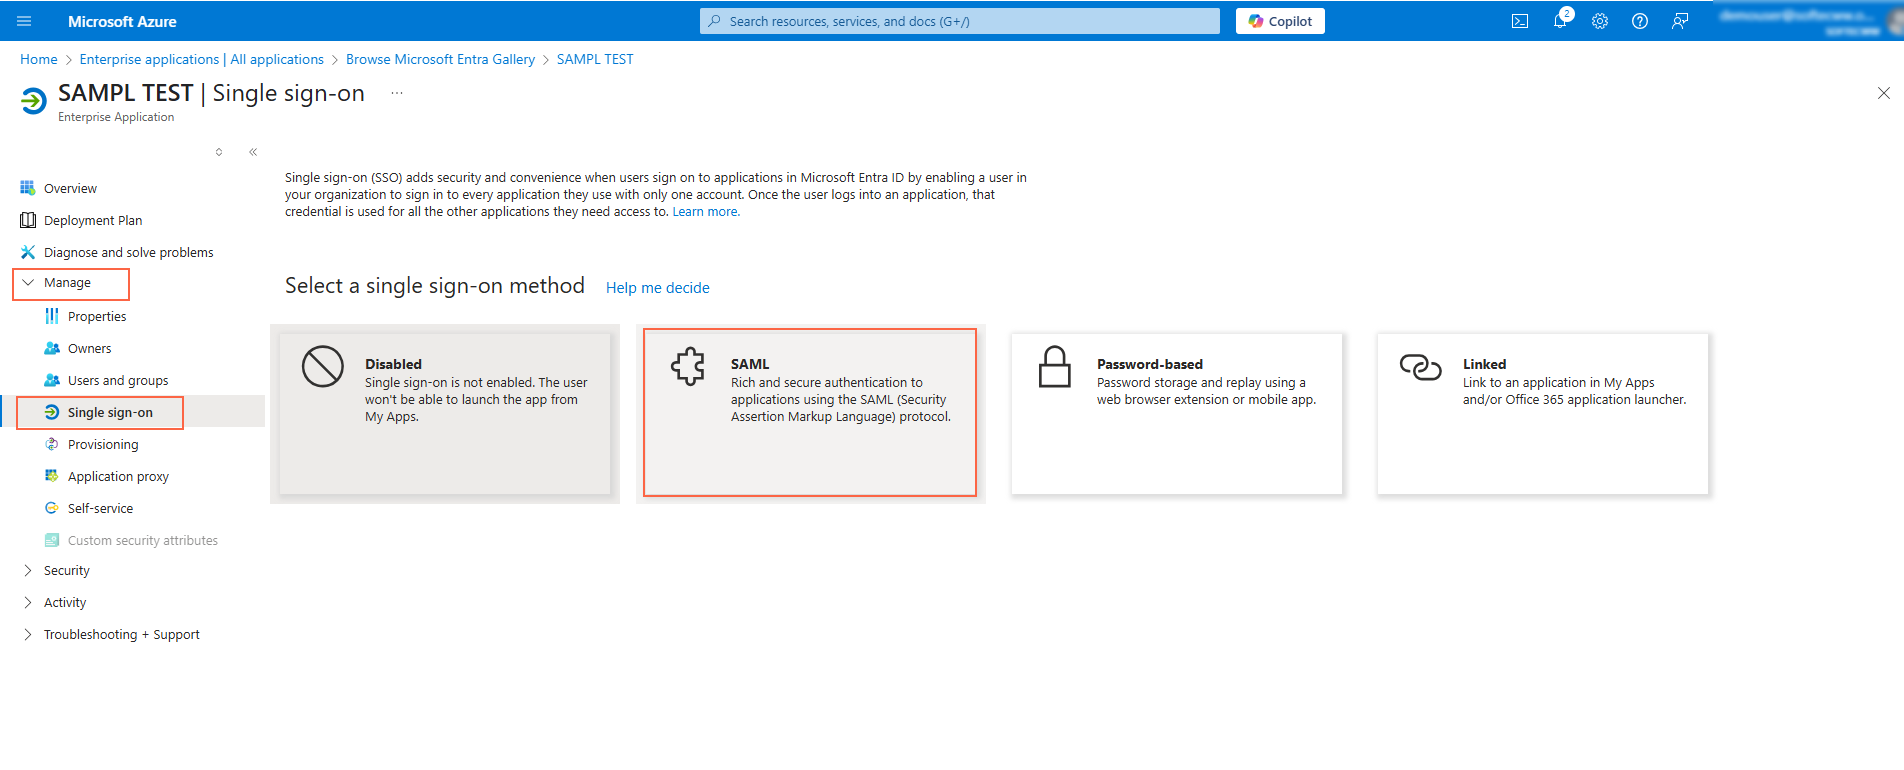
- In the enterprise application you created, select the Manage tab.
- Under the Manage tab, select Single Sign-On.
- Select SAML as the single sign-on method.
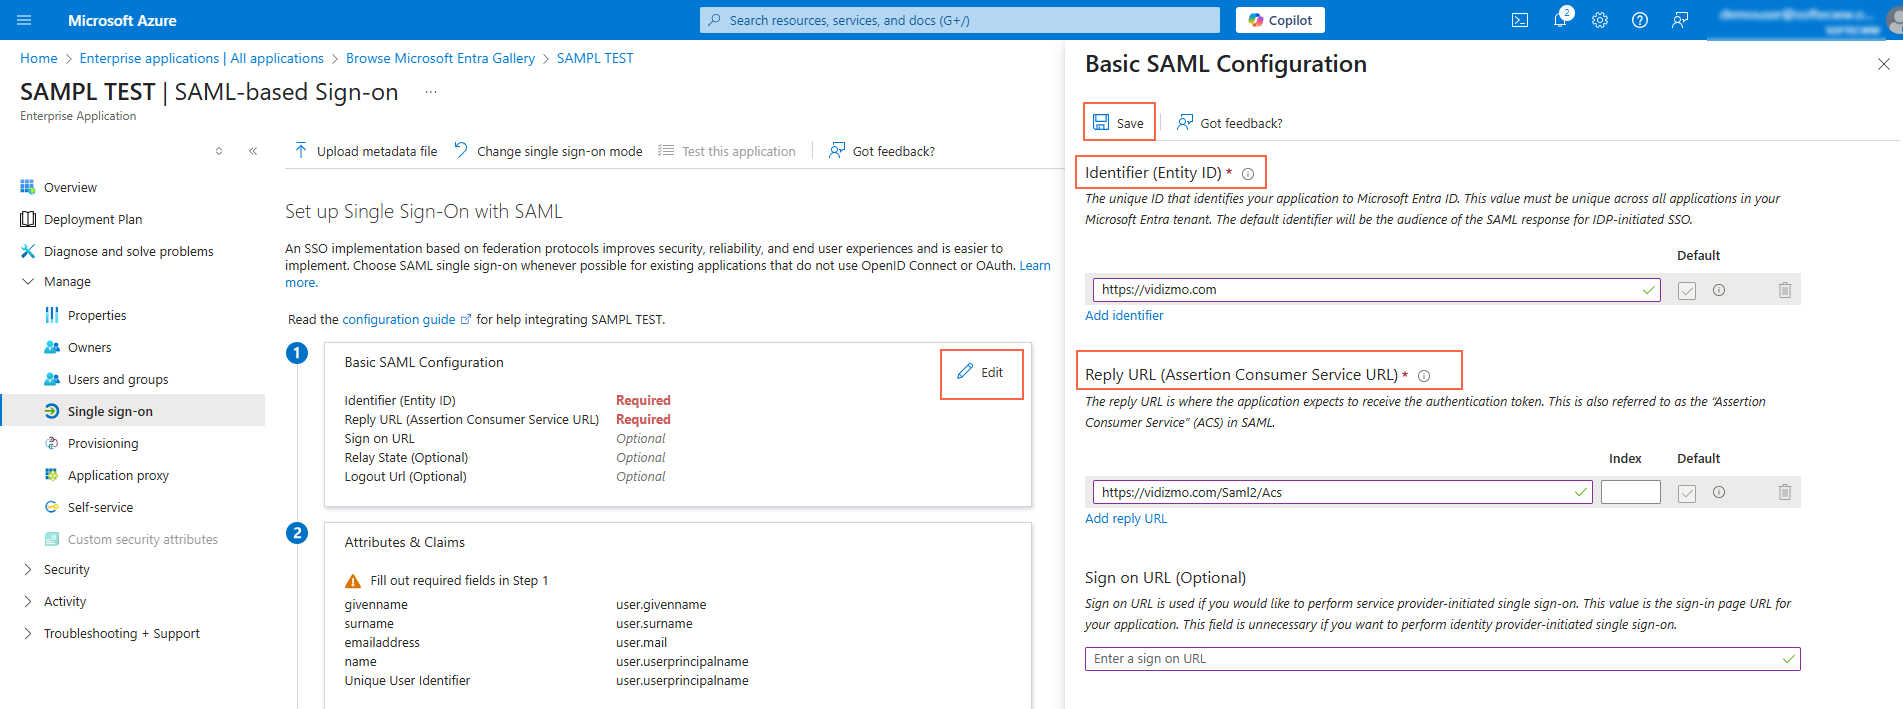
- Select Edit in the Basic SAML Configuration section.
- Enter the Identifier (Entity ID), which should be your VIDIZMO Portal URL (for example,
https://<vidizmo portal>.com/). - Add the Reply URL (Assertion Consumer Service URL) with
/Saml2/Acsappended to your VIDIZMO Portal URL (for example,https://<vidizmo portal>.com/Saml2/Acs).
NOTE: The path
/Saml2/Acsis case sensitive and must be entered exactly as shown.
- Select Save.
Attributes and Claims (Optional)
- Select Edit in the Attributes & Claims section.
- Select Add new claim.
- On the Manage claim page, enter the name of the claim in the Name field.
- In the Namespace field, enter only the base namespace URI (for example,
http://schemas.xmlsoap.org/ws/2005/05/identity/claims). Do not include the specific attribute suffix such as/givennamewhen entering this value. - Select Attribute as the source.
- Enter the source attribute name.
- Select Save.

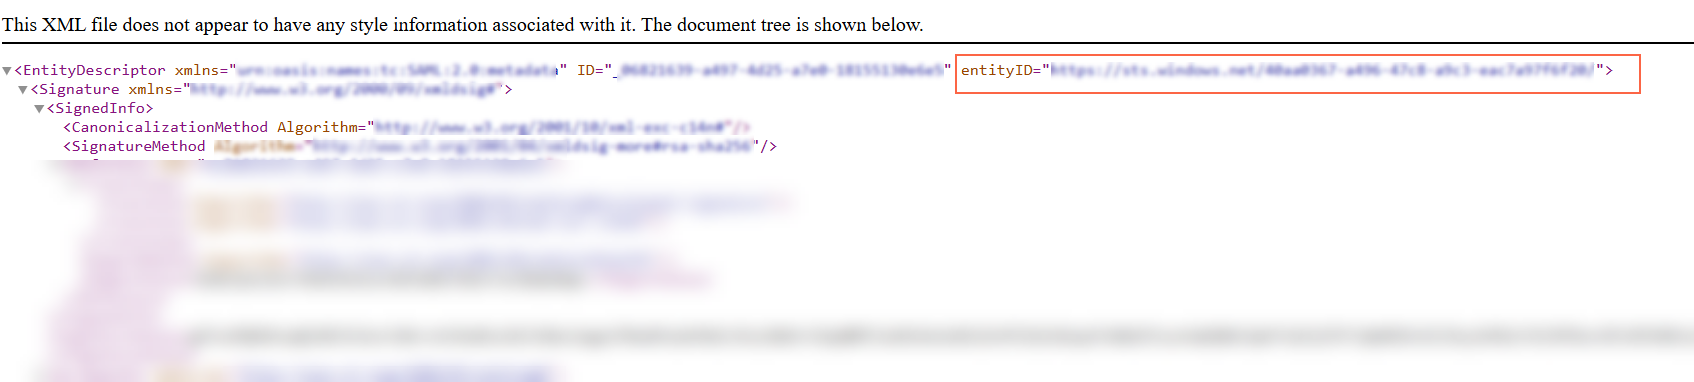
Retrieve Entity ID via App Federation Metadata URL
- In the SAML Certificates section, locate the App Federation Metadata Url.
- Copy the URL value.
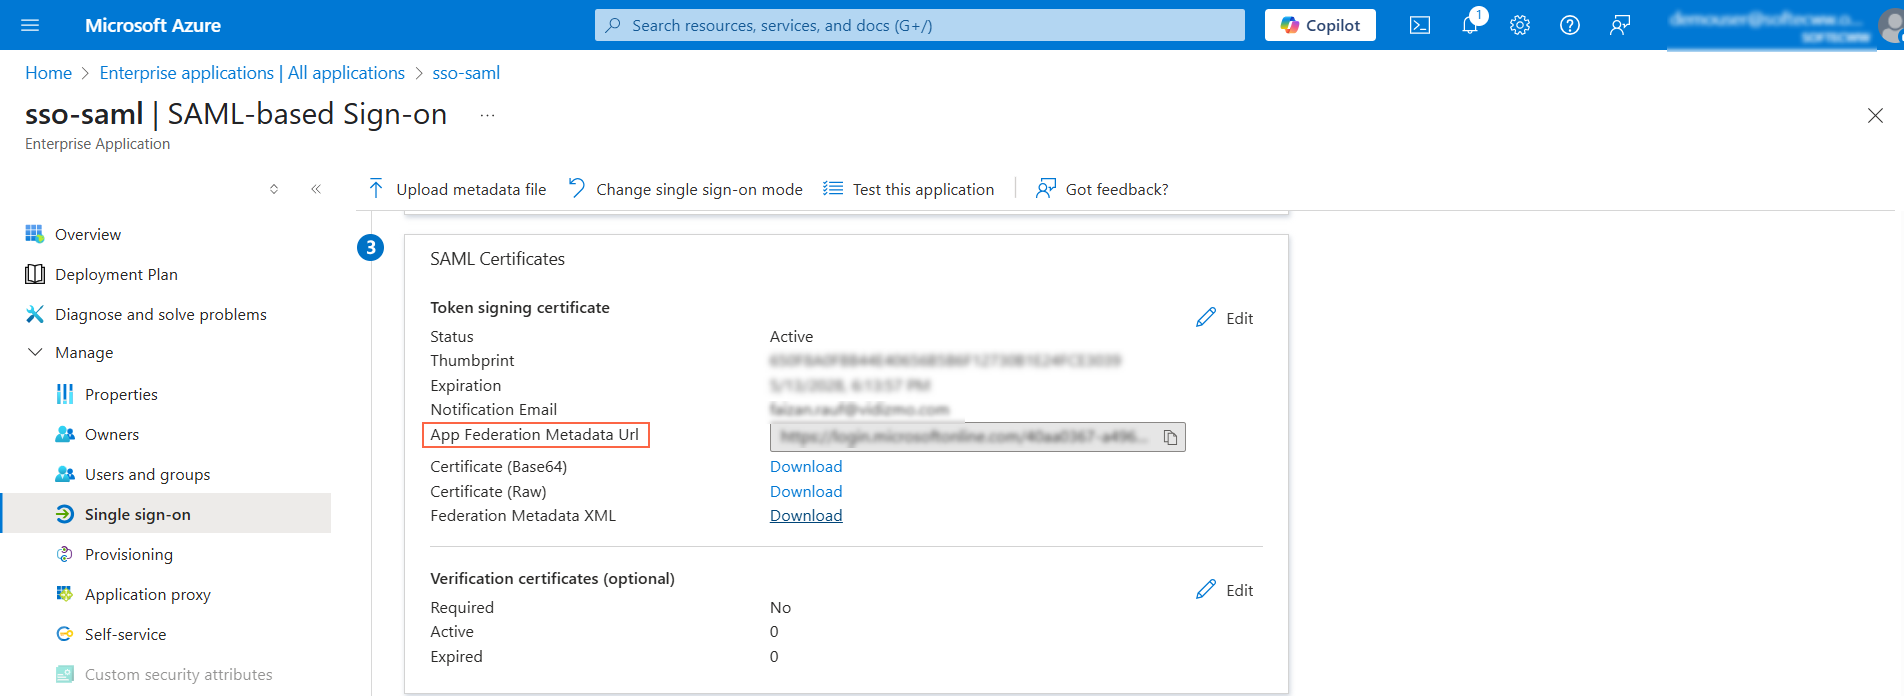
- Open a web browser and paste the copied URL into the address bar.
- An XML metadata file will open in the browser.
- Locate the entityID attribute in the XML file and copy its value.
- Save the copied entityID value. You will need it when configuring the SAML application in VIDIZMO.
Configuration in VIDIZMO Portal
-
From the Portal's Homepage, select the navigation menu.
-
Expand the Admin tab.
-
Select Portal Settings.
-
From the Portal Settings page, select the Apps tab.
-
Select the Single Sign-On tab.
-
Locate SAML and select the gear icon to open SAML P SSO - Settings.
-
In the SAML P SSO - Settings screen:
i. Samlp Issuer: Enter the entityID saved earlier.
ii. Meta Address: Enter the App Federation Metadata Url.
iii. Portal Identity: Your portal URL (for example,
https://lexcorp.enterprisetube.com).iv. SSO Login Message: Enter the message that you want to display on your portal login screen for Azure login.
v. SSO Login Button Label: The text entered here would display on the button used for Azure login.
vi. Callback Path: Specifies the callback location where the authorization will be sent to your Portal.
vii. Force Login: Select the checkbox to enable forced login. VIDIZMO uses your existing Azure session (if you are already signed in to Azure) and lets you into the portal without prompting for credentials.
viii. Attribute Mapping: Attribute Mapping allows you to map your attributes with the IDP's attributes.
- If multiple CAL (Client Access License) types are available in your VIDIZMO portal, you can select the desired CAL type. This selection will be automatically applied to all users who log in to the VIDIZMO portal using Azure SSO.
- Note that after the automatic sign-in and CAL assignment, the number of available CALs should be dynamically decreased and reflected consistently across all application screens displaying the remaining count, such as on the consumption screens.
ix. Select Save Changes.
-
Enable the toggle button of the SAMLP app.
Adding Custom Attribute Mapping (Optional)
You can add custom attributes in VIDIZMO by creating and mapping custom fields.
First create a Custom Field in VIDIZMO.
- Navigate to the Control Panel in your VIDIZMO portal.
- Go to User Registration Fields.
- Select Add Custom Field.
- On the Add Custom Field page:
- Enter a Field Name (case-sensitive). Example:
department - Select Field Type as Text.
- Enter a Field Name (case-sensitive). Example:
- Select Add Custom Field to save the new field.
Now map the Custom Attribute in your SAML-P App:
- In the VIDIZMO Attribute column, select Add New Attribute.
- Select the custom field you just created (for example,
department) from the dropdown list. - In the Provider Attribute column, enter the corresponding SAML claim URI. Use the following format:
http://schemas.xmlsoap.org/ws/2005/05/identity/claims/<your_custom_attribute>
- Select the custom field you just created (for example,
- Select the checkmark icon to confirm and add the attribute.
- Select Save Changes to apply the configuration.
NOTE: The custom field will only work if the matching attribute and claim are added in Azure Entra ID.
Result
Navigate to the Portal's login screen and you will see an option Login with SAMLP SSO.