Quickstart
Get started with VIDIZMO Agentic AI by enabling the feature, creating a workflow, configuring an agent, and testing it in the AI Chatbot.
This guide walks you through the complete setup process from granting permissions to testing your first AI agent. It provides a streamlined, step-by-step path designed to get you productive quickly without extensive explanations.
Each concept introduced in this quickstart workflows, nodes, agents, and the AI Chatbot is covered in depth in dedicated articles. Links to detailed documentation are provided throughout this guide and in the Learn more section.
What you'll accomplish
By the end of this quickstart, you will:
- Enable Agentic AI permissions for users
- Create a simple workflow using the Workflow designer
- Configure an Agent and connect it to your Workflow
- Test your agent in the AI Chatbot
New to these concepts? This guide includes everything you need to complete each step. For deeper understanding of workflows, nodes, and agents, see Concepts after completing this quickstart.
Prerequisites
- You must have Group Management permissions or belong to the Group Manager group in VIDIZMO.
- Agentic AI feature included in your VIDIZMO subscription plan.
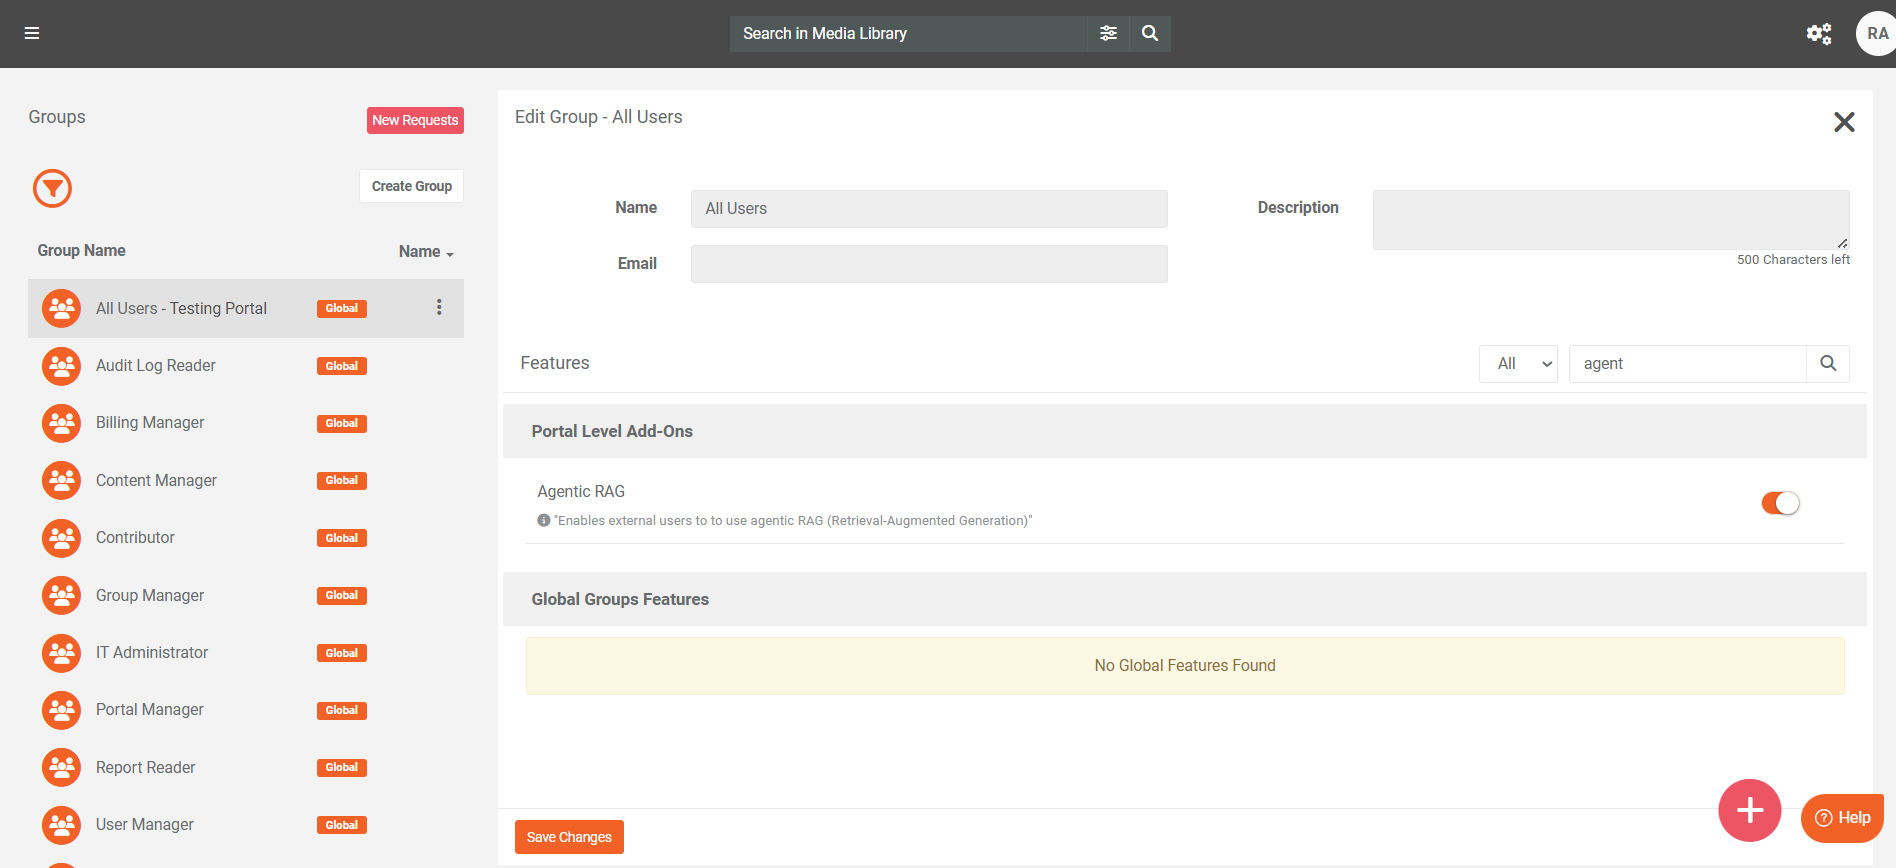
Enable Agentic AI
Agentic AI features are permission-based. Users cannot access the AI Chatbot, create agents, or build workflows until an administrator enables the appropriate permissions.
You can assign permissions at the group level. All users in the group automatically inherit the permissions.
-
Select the menu icon in the top-left corner.
-
Expand Admin and select Users & Groups.
-
Locate the group you want to configure.
-
Select the Edit icon next to the group name.
-
Scroll to the Feature Permissions list.
-
Enable the Agentic RAG.
-
Select Save Changes.
Note: Permission changes take effect immediately. Users don't need to sign out.
Build your First Agent
Now that permissions are enabled, create your first workflow and agent.
Step 1: Create a new workflow
-
Select the menu icon in the top-left corner.
-
Select Portal Settings.
-
Select Workflow Designer.
-
Select Add Graph
-
Enter a name for your workflow (e.g.,
My First Workflow).
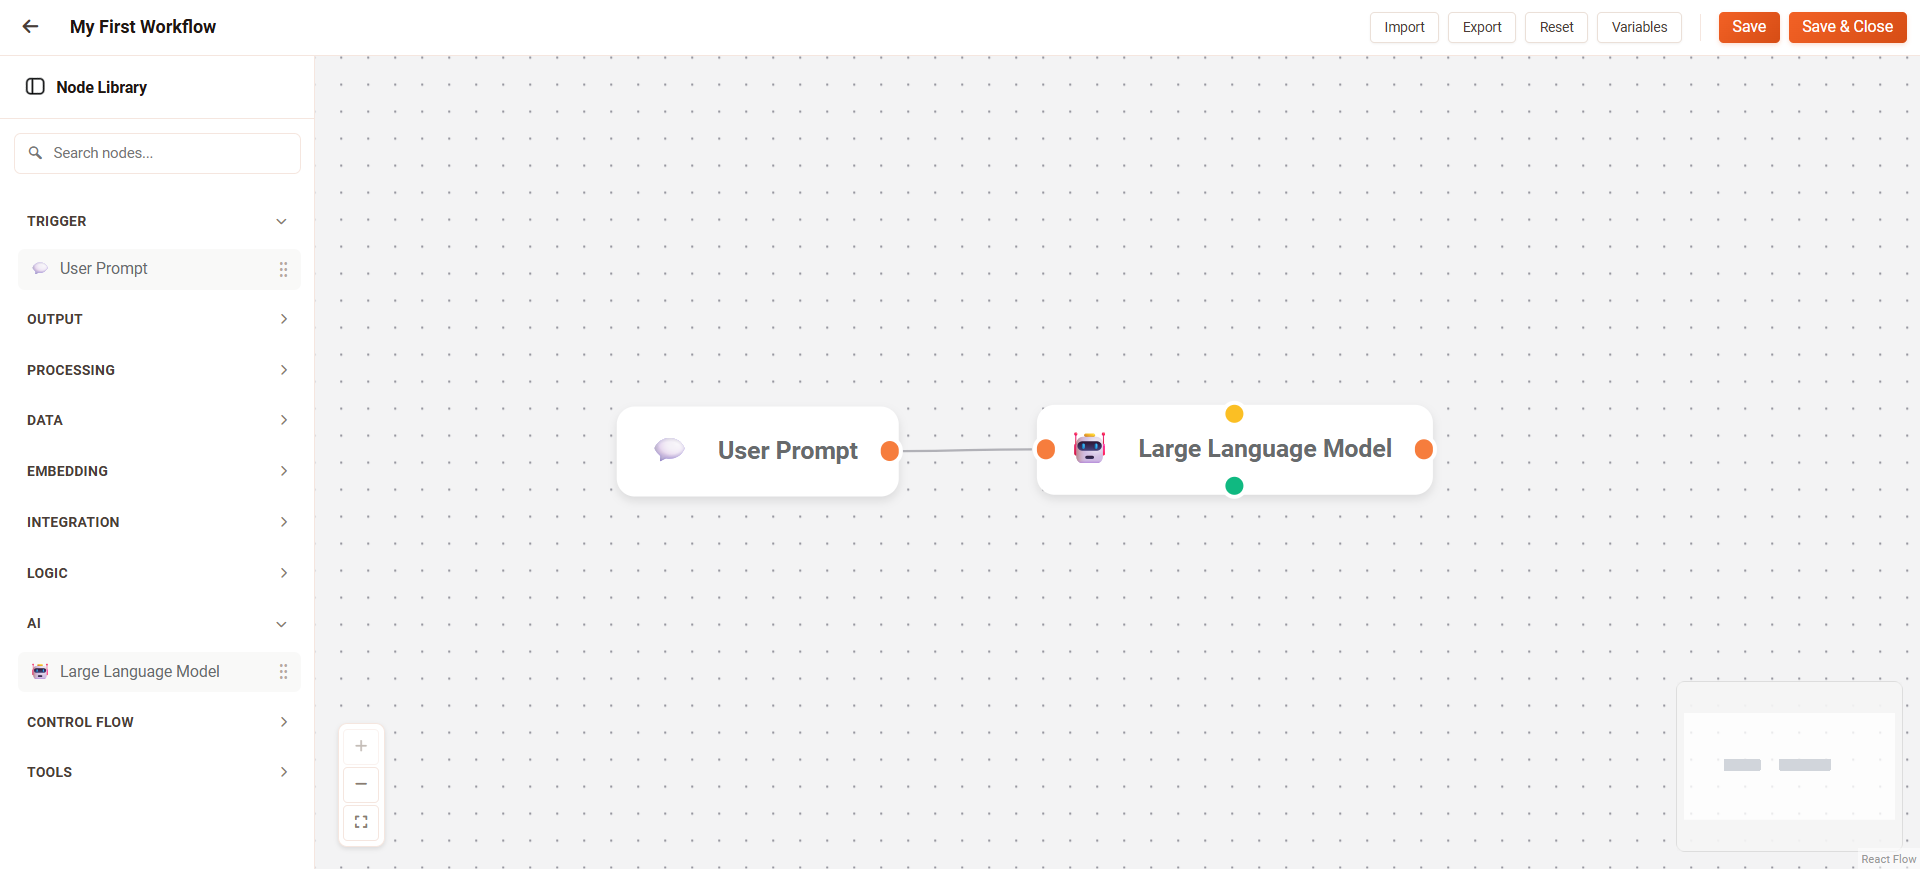
The Workflow Designer opens with an empty canvas where you can add and connect nodes.
What are nodes? The individual pieces in a VIDIZMO workflow are called nodes. Each node performs a specific task receiving input, processing data, or generating output. Double-click a node to explore its settings.
Step 2: Add an input node
Every workflow needs an input node to receive user questions.
-
In the Node library on the left, expand Trigger.
-
Drag User Prompt onto the canvas.
This node receives questions from users and passes them to the next node in your workflow.
Step 3: Add an AI model node
Add a Large Language Model node to process user questions and generate intelligent responses.
-
Select Large Language Model to add it to the canvas.
-
In the Prompt Template field, enter instructions for the AI:
You are a helpful assistant. Answer user questions clearly and concisely. -
By default, the node uses VIDIZMO’s pre-configured model. To use your own AI provider, select the Self-Hosted Model option.
Tip: For testing, you can skip this step and use the default model.
- Turn on the Stream Output Response toggle to display the AI's response in real-time as it generates (recommended).
- Close the node by clicking outside it or selecting Close Panel option.
Step 4: Connect the nodes
Connect the nodes by linking them so data can flow from the input to the output.
-
Click the output connector (small circle on the right side) of the User Prompt node.
-
Drag the connection line to the input connector (left side) of the Large Language Model node.
Your workflow should now look like this:
Step 5: Save and enable the workflow
Before connecting your workflow to an agent, test it to ensure it works correctly.
-
Select Save and Close in the top toolbar.
-
Enable the toggle to activate the workflow you created.

Step 6: Create an agent
An agent connects your workflow to the AI Chatbot, making it available to users.
-
On the Portal Settings page, select Agents Management.
-
Select Add New Agent.
-
Configure the agent:
- Title: Enter a name (e.g.,
My First Agent). - Description: Briefly describe what this agent does.
- Branding Details: Enter branding customization options.
- Graph Configuration: Select
My First Workflow.
- Select Save.

Key concept: Each agent uses exactly one workflow. The workflow defines what the agent can do and how it responds to users.
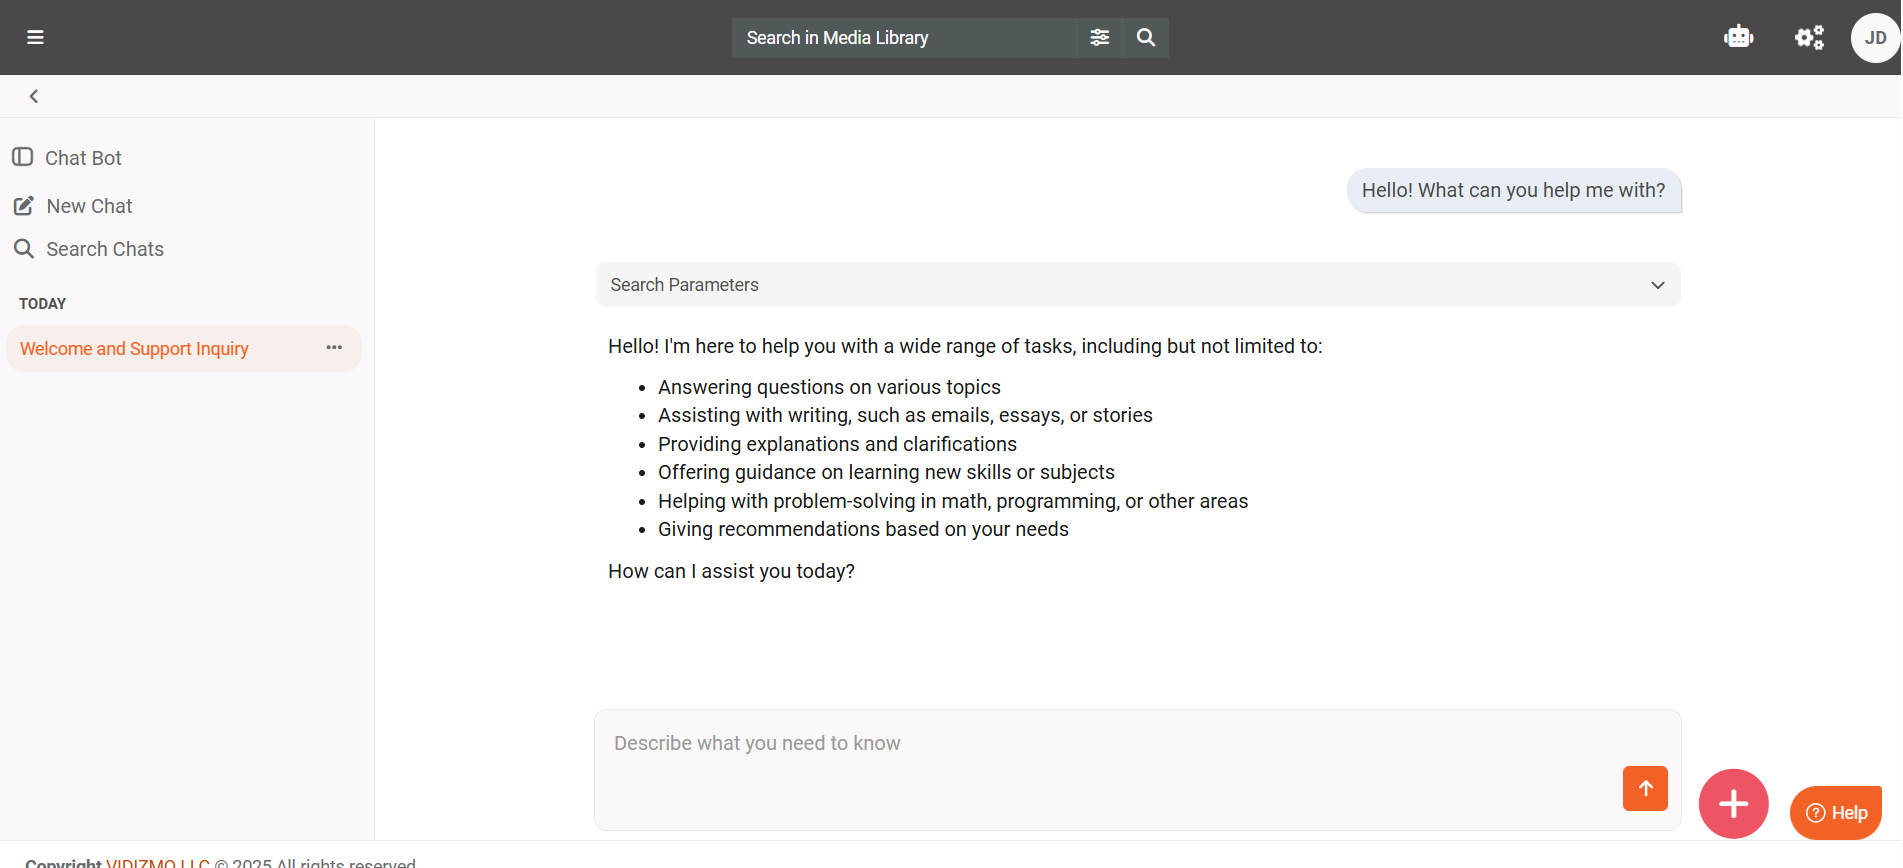
Step 8: Test in the AI Chatbot
Test your Agent by asking questions in the AI Chatbot.
-
Choose AI Chatbot icon in the header.
-
The Chatbot opens with your active agent ready to respond.
-
Type a question:
Hello! What can you help me with? -
Press Enter or select Submit Prompt button.
-
The agent processes your question through the workflow and returns a response.
Try asking different questions to see how your agent responds.
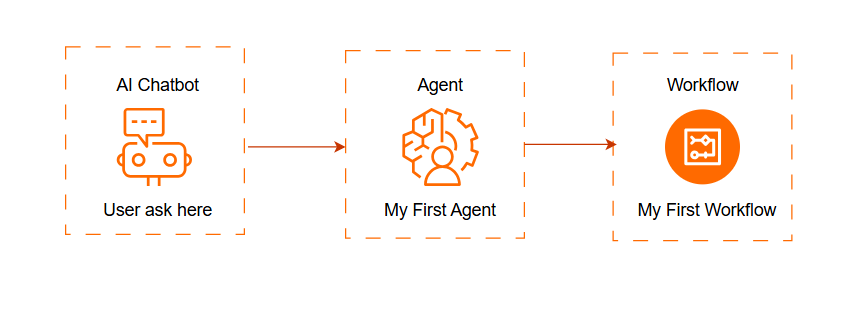
Congratulations!
You now have a fully functioning AI agent! Your completed setup includes:
Next steps
There are plenty of ways to enhance your agent. Here are some ideas:
Add content search
Connect your agent to your VIDIZMO content library:
- Add a Search Mashup node between User Prompt and Large Language Model.
- Configure it to search your videos, documents, or media.
- The AI can now answer questions based on your actual content.
Add logic to your workflow
Use conditional nodes to create smarter responses:
- Add an IF Conditional node to check the user's question.
- Route different types of questions to different processing paths.
- Create specialized responses for specific topics.
Learn more
- Agents to understand workflows, nodes, agents, and RAG.
- Workflow Designer to explore the full designer interface.